DV
Please note: while the following page contains many still useful hints on DV basics, there is a new page about camcorder->HDTV conversion
dated 2015, with the best prodedures for current hard- and software.
Introduction
How to convert older formats to digital
Capturing DV
Cleaning
High
quality cleaning
Encoding
DV to other formats
Archiving
Pinnacle
Studio
DV
codecs
DV Codec Test
Field
order problem
The MPEG variety: MicroMV
Archiving
to DVD
DV is obsolete meanwhile, as are tape recorders in general; Archiving old memories may however still be of interest.
This page
also covers old software versions in some parts. For the creation
of DVDs from your Digital camcorder videos, please refer to my
DVD page.
Attention :
Windows has it's DV decoder usually set to half format by default, i.e. it delivers only half the resolution (a stoneage remnant that was once introduced to save CPU power). So many people wonder why DV looks so crappy on their PC.
Fixing this works as follows:
In media Player 7 for example, select "Extras,Options,Performance" from the menu and set DV playback to Large.
If you don't use newer Media Players (good decision), do the following: in the taskbar, hit Start, Execute, then enter "mplayer2.exe". This will start the classic Media Player 6, that is still contained in all WIndows versions.
Then drop a DV file into the media player window. When it plays, from the menu select "File, Properties, Extended, DV Video Decoder, Properties". You'll get a window that allows you to select anything from full to 1/8 format. Select Full and "save as default", OK.
DV decoding should now be set to full format once and for all, and you'll get your full quality when playing or converting your videos.
Camcorders and tape systems with analog recording have several disadvantages with quality.
Mainly these are time jitter, noise and dropouts.
Many ingenious solutions went into the first home VCR systems. These achieved a quality that was good enough for viewing. However even the 2nd generation copy of such a tape yet looks bad, further copies look awful. If one wants to edit such recordings, he therefore faces huge quality losses. Nothing has changed with this, since the 1st VHS machines came out 20 years ago. The signal processing of all analog tapes has principally remained the same except of some very little improvements. This applies to S-VHS, Beta, Hi8.
DV records the signal in a digital format.
This way, tape noise is no issue any more. Time base errors are
completely corrected by a digital buffer.
The best thing is that the digital signal can directly be transferred
to a computer by a simple serial interface, can be cut and pasted
without re-encoding (except when effects are applied), and then
be rewritten to tape without the slightest quality loss.
Computer based editing solutions for
digital are many times cheaper than for analog, because the hardware,
an IEEE1394 board, is very simple.
Complete solutions with board and basic editing software are now
below 100$ and cheap large harddrives make it possible to store
and edit several hours of video. All this in broadcast quality
(given a tape shot by a good cameraman).
Let me remark that digital signal is compressed by 5:1, each frame separately. This means a certain quality loss with the first compression, but it's so small that I don't think it matters. In fact it's the only loss once and forever, as long as tapes are only cut and copied. If really one recompression is necessary due to effects etc., the losses are still hardly visible. Compared to the generation loos of analog tape, they are not worth mentioning.
Formats
There is only one signal format but 2
tape formats: MiniDV and Digital8. Only the mechanical dimensions
of the cassettes are different. Digital8 uses Hi8 sized cassettes,
MiniDV uses DAT sized cassettes that are smaller and allow to
build smaller camcorders.
The advantage of Digital8 is that the camcorders can play 8mm
and Hi8 videos as well. They even do that better than the old
machines, because D8 camcorders have a 'big' head drum like high
end Hi8 devices, and the output is already digital and time base
stabilized. Color shift, flicker etc. are also corrected.
This way you can already make a copy of an Hi8 tape without quality
loss.
If you buy Digital8 or MiniDV depends on your wallet and on the
question if you have many old Hi8 tapes. The only advantage of
MiniDV is that the devices are smaller. They are not that much
lighter however and at the moment they cost twice as much for
no really obvious reason.
NTSC users should note that the cheaper NTSC Digital8 camcorders
have underdimensioned camera chips that sacrifice too much resolution.
PAL versions are much better equipped (800.000 pixels at least)
and compete well with more expensive models.
System Requirements
- CPU of at least Pentium II class. CPU power is not crucial because it's only demanded when recompression is necessary, however a fast CPU (500 MHz or better) lets you play DV in full size right on your computer, which is a plus.
- IEEE1394 (also called DV or Firewire) card. Buy one bundled w. an editing software. I recommend Pinnacle Studio9.
- Operating system that supports the card such as Windows98SE or Windows2000, the latter having the advantage to support file sizes over 4 GB.
- 14 GB of harddisk space per hour of
video.
Harddisk able to capture 3.5 MB/sec. continuously. As a rule of thumb, every HD over 10 GB with UDMA33 interface can do that, reliably. An IDE drive is sufficient, SCSI is not necessary. - Motherboard that has PCI slots and supports harddisks over 8 GB and UDMA33. If there's an 8GB limit, this might perhaps be resolved with a BIOS upgrade. Some boards have a limit at 32 GB, same cure perhaps.
How to convert older formats to digital
Hi8 or VHS must be 'captured' either using a TV card or an analog/digital converter delivering DV format to the PC over Firewire or USB2. A cheap but perfect converter can be a Dgital8 camcorder that has an analog in/digital out feature. Some models in Europe don't have this because it costs extra fees if a device can be used as a video recorder. Check your unit's specs if it can do it. There also are standalone converters that do exactly the same thing. What you should beware of are converter boxes with unclear specs, there is a lot of crap around. What is also not a good idea at least in the lower price range are converters that directly convert to MPEG.
If you have no analog/DV device you may try to capture with a TV or a dedicated video card that then usually delivers an MJPEG file. The problem with these always is that your computer's CPU has to convert analog to digital on the fly and this can easily result in dropped frames or even crashes. Your CPU should at least have about 500 MHz for this task, but even much more is not always safe. VirtualDub for example has a capture mode that can take signals from a video card but it drops frames every 3 minutes no matter what you do. Many video card's own capturing software is utterly instable. What you want to have in any case this way, is the PIC MJPEG codec, as it is the fastest (less CPU intense) way to encode your file.
The best advice of all, so far: get an old Digital8 camcorder with conversion ability or a similar dedicated box, a Firewire card and ScenalyzerLive for the capturing. That's fool proof. If your tapes are 8mm or Hi8, almost any Digital8 camcorder should be able to play them itself, so in this case one with analog inputs is not necessary. You may however still want it if you also want to convert old VHS tapes from your VCR.
Once you have your analog stuff captured
in your computer, you want to clean it from typical analog flaws
like moiré, flickering, color shift, and convert it to a more current format.
Read the new camcorder->HDTV conversion page about this.
Editors like Pinnacle Studio are quite sufficient on good computer systems, but there are better ways, offering extra features, improved reliability and are even able to work well with WIndows98/ME.
Scenalyzer Live
is the recommended solution for any DV capturing, as it
is rock stable, drops no frames even on hardly sufficient system,
works in background with no fuss at all, and has a terrific set
of extra functions.
I contributed my .scn file structure knowledge from ScTrans to Scenalyzer Live, so it can now
write scene list (.scn) files for StudioDV.
ScenalyzerLive also generates .scn files by optical scene
detection on the fly (e.g. in real time while capturing analog
tapes). This scene detection BTW is working way better than that
of the older Scenalyzer freeware.
Unlike StudioDV, Scenalyzer Live can automatically start a new
capture file before the 4 GB limit is reached, and if possible
also does this at a scene change. It is easy to work with multiple
capture files in one StudioDV project, so this enables you to
capture as much full resolution footage as your harddrive can
take, without having to buy Windows2000,
and use StudioDV to do all editing (although I strongly recommend
to upgrade to WIndows2000 for video editing. I don't use XP so
far because it is neither different nor better in anything and
requires activation, which I regard as an assault on the customer).
Old (freeware) solution for Windows98:
(I don't recommend this anymore but I leave it here for information)
Example: capturing a 90 min tape to disc.
We need AVI_IO
or VirtualDub,
MainConcept codec (only if SDV's doesn't work), Scenalyzer, ScTrans (see above for details):
- capture a 90 min. tape: AVI_IO generates 5 gapless files in
90 min.
- you can also capture
with VirtualDub (on some systems this will crash, you'll have
to try if it works for you). The trick is to connect the analog
audio outputs of your camera to the line in of your sound card.
Set up the spilling system, select the WDM capture device, set
audio 'compression' to 32k or 48k 16Bit Stereo depending on your
source tape sound format. Use compatibility mode to capture.
- run Scenalyzer (not 'Live'): ~ 20 min for all
(hint: select option for high or highest scene detection
sensitivity;
Scenalyzer's scene recognition is very fast but not as good as
StudioDV's, so some experimentation may be useful).
- run ScTrans: some seconds
- open the files in StudioDV: some seconds
The 'normal' process
under Windows98 or WindowsME would be:
- capture segment one: 18 min
- with analog tape, scene detection another ~ 30 min
- manually rewind tape a bit
- repeat to capture segment 2 .. 5
This occupies you all the time, for up to about 4 hours.
(If you capture with AVI_IO or VirtualDub, capturing will be automatic
but StudioDV will detect scenes when you open the files, so opening
each file would take 30 min. and has to be done manually, even
with digital tape source)
Archiving DV tapes
Even if you still
keep your original tapes, it is a good idea to have a backup. I've
seen many tapes getting defective, some of them 'eaten' by worn out drives.
This applies to analog tapes as well; capture them to DV format
first and then proceed as follows.
DVDs are actually so
cheap now, it would make sense cutting the original DV capture
into approx. 20 minutes pieces and store them on a data DVD (UDF
file system). This is easily done with VirtualDub (cut functions
and direct stream copy). Much better, however, are external USB
harddisks, they have become even cheaper than DVDs and allow to store
many DV tapes in original format at ease.
You may want to keep these files
until smart upscaling ('double-resolution') and format extension (to
16:9) apps have become mature: DV (analog even more so) looks crappy on
a large flat panel, because of resolution, noise and poor deinterlacing
due to the noise; Some hints about dealing with this are in the cleaning page.
Probably you want to de-noise, de-interlace to 50p, de-shake, upscale
and perhaps even expand to 16:9. The longer you wait, the better the
software for this will get.
Read the new camcorder->HDTV conversion page about this.
In this case, it is extremely recommendable to apply VirtualDub's temporal noise reduction, gamma correction (levels or gradation filter) and if necessary, deshaking before encoding to DVD, even with the uncut material. This way, there is no further degradation if it's cut later on. Such uncut DVDs, if equipped with menus, can already be good enough for personal viewing. Encoding effectiveness can also be greatly improved by applying some filters, especially temporal noise filters. Read about cleaning, for more details.
Making a real DVD with menus is decribed in the DVD page.
When compressing DV to MPEG formats,
you should be aware that DV is interlaced.
You either need to use an interlaced compression format or to
deinterlace.
MPEG2, raw as well as in DVD or SVCD, can be interlaced. I would recommend to use interlaced if you burn DVD or SVCD for playback on stand alone players and TVs, and to deinterlace if the target machine for viewing is only a PC (many PC players have deinterlacing ability, so interlaced encoding can also be used).
Cinemacraft Encoder (CCE) I deem most recommendable to encode DV to MPEG2 or DVD. Important: set offset line to 1 for DV sources, no matter if you're encoding directly from the file or over a frameserver!
If you want to keep the maximum quality with camcorder footage, be aware that this footage has lots of motion and is quite noisy. So you NEED to filter it, and as even a simple clear blue sky has some noise even on a digital camcorder with a big chip, you always want to rub VirtualDub and its temporal smoother. More on the filter page. You may also want to use Deshaker, even if the cam had a stabilizer, as most of these stabilizers aren't that good. The third big issue is the gamma curve of these amateur cameras that makes a sunny day look like a moonshine or thunderstorm scene. Use VirtualDub's levels filter on that. Don't even hope that an expensive pro editing software will give you these abilities that VirtualDub has. These systems can do any kind of effects,but hardly any decent cleaning !
So you should filter it first, even if you want to encode just for archiving. The rest of it is simple: Rum CCE Basic (the affordable version of the encoder) just at the maximum constant bit rate, i.e. 9000 kbps. Any attempt to improve things by doing VBR (variable bit rate) or multi pass encodings will not be any better here, as the encoder doesn't know that you never need that noise or those millions of leaves in that wood exactly reproduced ant that for a human being, the face of a person is a hundred times more critical. So don't let the encoder waste bits to noisy parts of the footage (and with amateur camcorder footage there will most likely be some of these even after the cleaning), what would happen with a VBR encoding.
You may ask if you couldn't just use the encoding features of your DVD burning or DV editing application instead of CCE. Well, you can, but many of these require twice the bit rate for the same quality. So if you don't spend the money for pretty professional editing applications, you may be way better off with using CCE, or some of the really competitive products like Canopus or MainConcept, separately.
More details in the MPEG2 section.
If you want to use TMPGenc for the MPEG encoding,
select an adaptive deinterlacing filter (advanced settings) if
necessary. Use field order B with PAL movies (field order A for
old TMPGenc12). The 'field order problem' will most probably not
occur with stand alone players, so selecting the correct field
order will be all that's necessary.
I recommend always to use TMPGenc's edge enhancement filter at
maximum setting for horizontal, because TMPGenc tends to produce
MPEG images that are a little too soft.
You may also encode a progressive MPEG2 for computer playback, if your PC is fast enough.
The next section is outdeted - Read the new camcorder->HDTV conversion page about this.
For MPEG4/DivX4 and other codecs mainly used for PC viewing, I recomend to encode with VirtualDub and use Smart Deinterlacer, with these settings:
Note that we again use phase shift / field swap after phase shift to compensate for the DV field order problem. It's not that apparent if you deinterlace anyway, but the swapping provides for a little better quality.
In order to reduce noise and edge noise often included with camcorder footage, use Smart Smoother before the deinterlacer, with the 'interlaced source' checkbox on and Radius=3. Smart Smoother is quite slow but very good. It doesn't reduce crispness. The noise reduction allows for the MPEG encoding at lower bitrates and also helps the deinterlacer.
Capturing
DV
DV
codecs
Field
order problem
Encoding DV to other
formats
This reflects only my personal opinion.
I'm not able to test each system on the market so I've gathered
as much information as I could get and decided to buy the Pinnacle Studio (first Version was called StudioDV, I've tried
it until Studio9) because of its unique user interface and its
fairly low price (<100$ street price) and much less for the
9SE (OEM) versions for example that have only small restrictions.
Be aware that some people tried to sell the SE for almost the
price of the full version. Don't fall victim to that (especially
in the US, there are numerous software cheaters online). The fair
price is a fraction of the full version.
All Studio9 versions e.g. seamlessly do MPEG2 and all necessary
functions. Main restrictions of SE are that it does no motion
menus and lacks some fun filters (but not the cleaning filters).
The real surprise is that all Studio9 versions came with the PIC
MJPEG codec included, you don't have to buy it extra.
A lot of info about Studio can be found at the Pinnacle
Webboard (section:
consumer webboard), and also on Mike Shaw's
pages.
Meanwhile there's Studio12 but as times do change, I'm more fond of the latest Magix software meanwhile and recently added a new page on it. But nevertheless Studio pioneered intuitive video editing intefaces. So the following may still be interesting.
The user interface of Pinnacle Studio
is the most intuitive I know:
Studio can recognize scenes on the fly because of the time stamp
information in DV data. It assembles a storybook where each scene
is represented by one thumbnail image.
Then you simply drag these to the timeline as you want, trim them
separately, insert transitions and play the result back to tape.
The advantage is that this 'timeline' is not continuous like in
other programs where you get lost trying to find seconds long
scenes in hours of footage. Here each scene is one thumbnail image,
be it 1/10 or 1000 seconds long. You get a linear display of each
scene by double clicking on the thumbnail image and then you can
trim just this scene.
Scenes can also be repeatedly used, single frames can be used and displayed for any desired length, audio can be dubbed and mixed in etc.
It's not as powerful as Premiere or Media
Studio, but much more easy for beginners and in my opinion, also
much more easy and useful than the Video Studio that comes bundled
with most cheap cards.
Meanwhile, Studio9 has been released which offers more filters
and effects and therefore can better compete with 'semi-professional'
programs like Premiere or Media Studio.
What is pretty crappy, that even Studio9 still is stuck with a half format preview screen. So one cant't tell if the footage is really crisp. Most peculiar, if one uses huffyuv instead of DV, the preview IS full res (however ultra slow for no reason at all).
An advantage of Studio is that it captures in DV type 2 format, which can be read by VirtualDub and TMPGenc and also Adobe Premiere without further conversion. There is no file size limit if you use Windows2000. If Studio would be equipped with a frame server to directly interface with other programs, there'd be no wishes left....
Older versions of Studio were not very
good at avoiding recompressions when saving edited material. With
version 9, this has been solved even for MPEG2 in/output.
It would be ideal if
it wouldn't decide by itself if the input is DVD compliant or
not. Sometimes it recompresses MPEG2 for no reason at all and
it never tells you what it is going to do.
MPEG1, MPEG2 and Real Video compressors
are integrated, but not with the quality of CCE or TMPGenc. Most
VFW codecs (like MPEG4) can be used with most versions of Studio.
Given the limited abilities of other editing softwares in this
area however, this isn't too bad. The Real Video encoder works
great BTW.
Under Windows98SE, you can only capture 18 minutes in one piece.
That applies for all cards except the Canopus
EZDV, which supports multiple files
and even works with Windows95, but costs so much more that you
could easily buy Windows2000 for the difference (very much recommended
anyway), or you get ScenalyzerLive,
which is much cheaper and offers capturing tricks that blow your
hat off, and is fully compatible with Studio.
Studio can also do scene recognition with analog tape, by image analysis. I however recommend to get Scenalyzer Live for capturing, it is much better at this and many other tasks. A very good feature of it is to save back to tape with extra info, so you can store the entire editing project for later revisions.
I have analyzed Studio's scene list (.scn)
file format and created a little program I called ScTrans,
that can convert Scenalyzer's scene list
format to Studio's and
therefore allows to work on the processed DV file afterwards.
ScTrans can handle Scenalyzer output from multiple file scans.
So you can capture to 4GB segments with AVI_IO, let Scenalyzer
run over the files in one step, let ScTrans convert to .seg files
in one step.
However, ScenalyzerLive is much better than the older Scenalyzer freeware, so I submitted the author my .scn file knowledge and he integrated .scn file generation.
ScenalyzerLive can also make 2 GB segments that can be opened by SDV and each will show up as a booklet of scenes.
If you want to improve pictures with VirtualDub, using ScenalyzerLive's option to split scenes into separate files makes sense. VirtualDub has better tools for image cosmetics than most of the sophisticated video editors, and it can also merge the files afterwards, using its 'add video segment' function.
Normally I run the entire DV file through VirtualDub for filtering (several hints and tricks on my DVD page), but some processes like deshaking require to work on scenes separately.
Software codecs are used for display and rendering of DV files. StudioDV came with its own codec, which was decode-only and not even necessary for the StudioDV because from version 1.04 on, SDV used the Microsoft codec. The MS is not based on Video for Windows (the old 16 bit interface) but on DirectShow.
Studio9 comes with its own DirectShow DV codec.
Scenalyzer freeware, as well as VirtualDub need a Video for Windows (VfW)
DV codec. They can't use DirectShow codecs. So if you have a Pinnacle
VfW codec on your system, leave it in place. The programs mentioned
need it only to read.
Under Windows98SE, an alternative could be the Adaptec codec.
However this doesn't work under Windows2000. What also doesn't
work to open files compressed with it with StudioDV and then exporting
to the camera. SVD will open the files but you would have to save
to an AVI file in DV format (complete recompression), open this
again and then you can send to the camera but sometimes even this
process gets problems. Reason unknown.
So if you want to do edit jobs with Premiere or VirtualDub, either
save as MJPEG at Q=19 (SDV then recodes only these parts to DV)
or get the MainConcept codec. The
real surprise is that Studio9 comes with the PIC MJPEG codec included,
you don't have to buy it extra.
The MainConcept DV codec also works with Windows2000 and XP. This one costs about 50$. The trial version will read files without restrictions but watermarks them when it writes to files. One of the fastest and best codecs, recommended except for playback with Media Player. There at least older versions were slow and had a green shift. If you recompress with MainConcept DV, be shure to uncheck the "fastest" option in the encoder settings ! Otherwise you get crappy quality !
Free alternatives for Windows2000/XP are the Panasonic DV codec (there are some issues with it, read the comments!) and the Cedocida DV codec, which is open source and needs to be compiled before use. A web search would probably find a compiled verson. Reportedly this codec is working well.
If you do not want to re-encode to DV, but only Virtualdub to read DV files, you can make it use Window's DrectShow DV decoder by installing AVIsynth, write a little script (a text file that you save with the extension .avs) and open this .avs file with Virtualdub.
Example script:Videoclip=AVIsource("U:\myDVfile.avi")
return(Videoclip)Of course, change the name of the source file and path to your own.
If you play back DV with Media Player, you will have to get into "File/Properties" the first time and set the playback resolution to full, otherwise you'll wonder why the picture looks so bad !
Under Windows98, I could achieve perfect playback with Media Player even with the Adaptec codec installed. Apparently Media Player in this case still uses the MS codec dll because it plays fluently in full format (PAL, on a Celeron 600).
Under Windows2000 w. the MainConcept
codec, I had Media Player stuttering after installation. Sometimes
Media Player also uses the MS codec when MainConcept is installed,
but If not, it is helpful to switch between codecs. Under Windows2000,
codecs can be changed on the fly by using .reg files:
All codecs have different dll files that do not conflict on your
disk. The only problem is that there is only one registry key
that determines which dll is to be used. Changing this key can
switch between codecs. No reboot necessary.
This is for only people
with some computer knowledge:
The key where the active
codec dll is assigned, is located in the system registry under:
[HKEY_LOCAL_MACHINE\SOFTWARE\Microsoft\Windows NT\CurrentVersion\Drivers32]
The key for StudioDV
it is:
"VIDC.DVSD"="miroDV2avi.DLL"
The key for MainConcept
it is:
"VIDC.DVSD"="mcdvd_32.DLL"
The key for the Microsoft
codec is:
"VIDC.DVSD"="qdv.DLL"
You can use Regedit.exe,
located in your system folder, to look at the keys and to export
keys to .reg files.
Reg files can be edited (right click and choose edit), and they
can be re-imported to the registry by double clicking on them.
So you can easily make several .reg files containing only this
path and key (remove other keys that may have been exported as
well), with different key values, and change just this single
registry entry by double clicking. One separate .reg file for
each codec is necessary.
DV Codec Test
The quality of the codecs
may be quite different. Older NTSC versions of the Microsoft codec
for example had real problems, but with newer ones all that happens
is a generation loss with multiple recompression. This generation
loss can range from almost zero to visible artifacts, however
the first generation is hardly visible with almost all codecs,
so recompressing only once as usual with DV editing (and mostly
confined to transitions and titles) does not constitute a major
problem.
Carrying out tests over multiple generations is tedious and I've
also found only a few useful test results on the web.
One is at http://www.m2w.net/reviews/dvcompression9808.html.
They tested the Adaptec,
Apple,
and Radius
codecs.
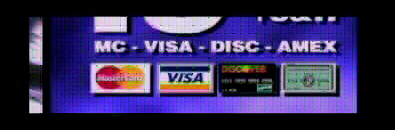
The Microsoft and the MainConcept codec are not contained in there, so I've done a multi generation test with the same image and the codec from MS DirectX8.1 (PAL version) and the MainConcept codec, both in Windows2000.
MS DV codec generation loss.
It's not a good codec but OK for 1 or 2 generations except the
updrift of the yellow color (seen at rhe VISA symbol) that may
already be visible in the 1st generation. I have also tested the
codecs in DirectX8.0a and the codec originally contained in Windows2000
(then with DirectX7), the difference for PAL is marginal. No reason
to upgrade to DirectX8. With NTSC, it's a different story.
 Microsoft,
15 th generation
Microsoft,
15 th generation
 Microsoft, 8 th generation
 Microsoft, 1st generation
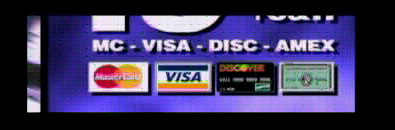
MainConcept DV codec generation test.
This one is quite perfect.
 MainConcept 15
th generation
MainConcept 15
th generation
 MainConcept 8 th generation
 MainConcept 1st generation
The conclusion is that there are good and bad codecs, not much in between, but that even the bad ones don't really constitute a problem if only some occsional effects are rendered. For more complex work, especially if entire films are filtered, a good codec will be of advantage.
A codec site
mainly concerned with Apple/Quicktime is onerivermedia.com. They also feature codec
test pictures.
As they don't contain MainConcept and other codecs important for
Windows users, here is a comparison with their DV test picture
(the picture was inserted as a title background and encoded with
all codecs in Pinnacle Studio8). I also did some MJPEG and MPEG2
tests with this.
The picture contains some parts (1-line color patterns) that are
impossible to reproduce with normal TV sets and would at least
require RGB or digital connections to get through.

Huffyuv (lossless) encoded picture.

MainConcept DV encoded Picture. The color blockiness is from the
fact that DV (like TV in general) has a lesser color than B/W
resolution. This is not visible on TV because the human eye also
resolutes color worse than luminance, the reason why most TV standards
also have a color resolution that is only 1/4 of the B/W resolution.

Microsoft DirectX 8.1 DV codec encoded picture. 1st generation
is quite acceptable, except for the vertical yellow shift. For
multiple generation results, see above.

PIC MJPEG at Q=18, 1 field. Color resolution set to 4:2:2, which
is higher than TV standard or DV (4:1:1).

PIC MJPEG at Q=18, 2 fields. This is better for interlaced video,
but as found earlier, atifacts grow.

PIC MJPEG at Q=19, 2 fields. This is pretty close to Huffyuv,
at much lower data rates.

Same as above, after 8 recompressions. The recompression ability
can compete with MainConcept DV. If this is not yet enough, one
could set quality to 20.
Now
some MPEG2 encoding samples
(done with the Huffyuv file
as input and 6000 kbps CBR):
Huffyuv (lossless) encoded picture.

Pinnacle Studio8, default settings: Worked slowest of all and
has problems with the fine color patterns (no big problem with
natural pictures).

TMPGEnc 2.0: As found in previous tests with older versions, this
is also a bit blurry.

CinemaCraft Encoder (CCE) Basic ('Quality' filters off): Speed
wise, it runs circles around the others (real time on a 3 GHz
P4, 2 times faster than TMPGEnc and 2.5 times faster than Studio8).
Also best crispness and least ringing. I have recently replaced this picture: Before, the
green was too dark, due to some incompatibility with VirtualDubMPEG2
that I used for reproduction. This here
was opened with DVD2AVI, recoded to Huffyuv and then grabbed with
VirtualDub 1.5.
The compression ability of CCE is also extremely good, which cannot
be demonstrated by still pictures of course.
Conclusion:
The DV codecs all look a bit bad because
they have a 4:1:1 color resolution. That means nothing for typical
video application, because in an appropriate viewing distance,
the human eye won't see the difference, a fact reflected in most
TV standards. MJPEG and MPEG codecs can deliver more, but you
can only see this with special displays (computer screens, hich
end beamers) and if the picture is blown up beyond reason. Cameras
using DV standard won't deliver that resolution anyway. This test
picture delivers some interesting insights, but it is simply overdone
for DV.
The results for MPEG2 show CCE Basic clearly leading. The differences
would have been less obvious if we had not taken a lossless source
but a DV source.
This problem has been solved with newer software versions. Latest recipes for DV to MPEG conversion are on DVD page.
Own observations and problem reports by several users have revealed that there must be compatibility issues in the way interlaced video fields are ordered (or decoded, as DV stores fields into 1 frame) against other video formats available.
Obviously, the captured DV shows inverted field order compared to TV captures as well as industrial DVDs, and not only that, it has inverted even and odd TV lines AND inverted sequence of field playback, so the effects compensate for still images but become apparent if something moves. It is not yet clear to me what really causes the problem. It survives encoding to different compression formats but I also had the case that an SVCD directly encoded from DV (with TMPGenc) and burned with NERO worked correctly on a desktop DVD player.
The Field order switches available in most softwares can not compensate for this problem. They can only switch spatial or temporal. Smart Deinterlacer for VirtualDub so far is the only one that can do both (see below).
The effect always shows up, when DV is converted to another video format interlaced, or when another interlaced source is converted to DV and then sent to tape. I tested MJPEG, MPEG2, DVDs, MediaPlayer, Matrox TVout, and people reported the problem with self made DVDs also. Even MPEG2 directly made in StudioDV, from original DV capture, may be inverted, as are typically all Pinnacle DC10 MJPEG captures when imported to StudioDV. I also tested capturing with DVIO and MPEG2 encoding with TMPGenc and the problem was also there. So it can't be a problem of StudioDV but is a problem of DV in general. The inversion compensates for mere editing and recording back to tape, so I first suspected that the Camcorders use inverse field order, but the real problem may as well be the soft DV codecs, because they interface the DV stream not only to other formats but also to MediaPlayer for playback. So far I've tested Microsoft's and MainConcept's codec because these are the best and most frequently used ones. Even if the Camcorder codecs would be the real course of the inversion, they can't be changed any more with tens of millions already in use, so a change in the soft codecs could be the only cure for the problem.
So far I could determine that this weird behavior very often occurs, but there are cases where it does not, so the only way to determine if a certain conversion process is affected is just to try it out very carefully. For example, interlaced SVCD from TMPGenc 2.0 played well on desktop DVD players. TMPGenc's frame doubling deinterlacer filters (Even/Odd...) also work properly.
Several software DVD players can deinterlace, and also my TV-out (Matrox) has a help file that misleads users to switch to one field with interlaced material. No wonder only a few people stumbled over the problem and even less could identify it.
As long as there is no other solution,
here is a workaround:
Donald Graft's Smart deinterlacer filter for VirtualDub, latest
version, has more field ordering options.
Just check phase shift, field swap after phase shift, disable
motion processing. That does resolve it.
VirtualDub can encode to MPEG4 directly or frameserve to TMPGenc (MPEG2) or MS WindowsMedia8 encoder. All work well with interlaced material. A definite advantage for storing DV footage on a CD, if you have a good TV-output.
Here's a screenshot of the settings:
Copyright (C) 1998-2011; all
rights reserved. All
materials in these pages are presented for scientific evaluation
of video technologies only. They may not be copied from here and
used for entertainment or commercial activities of any kind.
We do not have any relation to and do not take any responsibility
for any software and links mentioned on this site. This website
does not contain any illegal software for download. If we, at
all, take up any 3rd party software here, it's with the explicit
permission of the author(s) and regarding all possible licensing
and copyright issues, as to our best knowledge. All external download
links go to the legal providers of the software concerned, as
to our best knowledge.
Any trademarks mentioned here are the property of their owners.
To our knowledge no trademark or patent infringement exists in
these documents; any such infringement would be purely unintentional.
If you have any questions or objections about materials posted
here, please e-mail us immediately.
You may use the information presented herein at your own risk
and responsibility only. We do also not guarantee the correctness
of any information on this site or others and do not encourage
or recommend any use of it.
One further remark: These pages are covering only some aspects
of PC video and are not intended to be a complete overview or
an introduction for beginners.