New camcorder tape procedures
Here are the latest hints on saving your analog gems with maximum efficiency. The procedures are intended to make the results look good on a HD flatscreen. They are therefore different from the old ones featured earlier on this site. Moreover, they are designed to work as quick as possible, and to utilize the latest developments in video compressing.
Note that in my opinion, formats like DVD and BluRay have become entirely obsolete for personal use. They serve as a crutchet for ancient commercial distribution schemes. I am fed up with filling my shelves with tons of plastic junk and spending my time serving as a disk jockey. Media stuff has to go to a harddisk or a NAS server, nice and compact quickly accessible.
As almost any devices now can play AVC (h.264) at ease, and the free encoders produce perfect quality files twice as compact as mpeg2, the examples here feature AVC file encoding only.
Capturing
analog
sources
There
is a wide selection of product promising to capture analog video.the
quality of the results, however, is questionable most of the
time. Cheap solutions have minimal hardware and rely on the
computing
power of modern CPUs. The problem here is the quality of
the codecs used. Generally, good quality capturing needs some dedicated
hardware support. Again one can't be sure about the quality of hardware
encoders as well. High quality capturing, and this is the general
conclusion if you follow discussion on this, doesn't come cheap.
You can save
that money with a digital camcorder that has an analog-to-DV function
built in (most better Digital8 models have this). The
camcorder has a basic image stabilizer, not exactly like professional
solutions, but quite sufficient. If
you combine
this with the now free ScenalyzerLive capturing software, you
can be sure to get very close to the best capturing
quality possible.
The camcorder may directly play standard as well
as Hi8 tapes, and also digitize external signals from a VHS recorder.
The digital
output comes by Firewire, so you may need to add a cheap interface card
to your computer, if it does not have this already.
The captured files are easily processed with
VirtualDub. This
freeware application has a host of built-in and third-party filters,
especially for cleaning, that aren't even remotely matched by any
commercial software.
Format
considerations
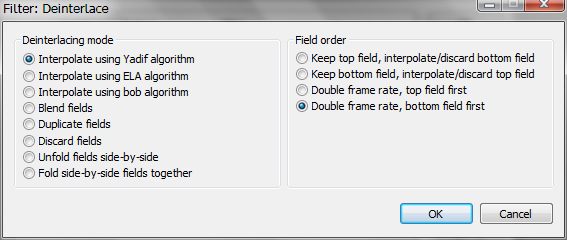
Both camcorder and
VHS source are interlaced. With devices now easily capable of
playing progressive video. this is obsolete and you may want to get rid
of it. Especially for valuable camcorder tapes, converting to
progressive (with doubling the frame rate, of course, to retain the
motion resolution) is the way to go. Old VHS TV recordings may not be
demanding such effort.
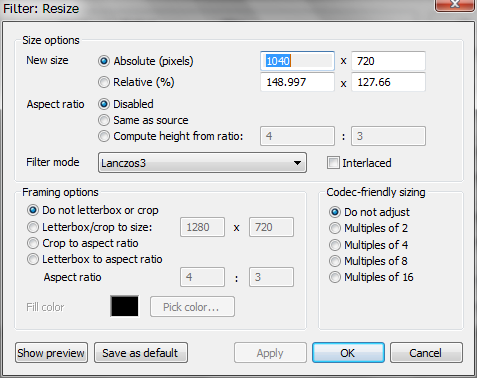
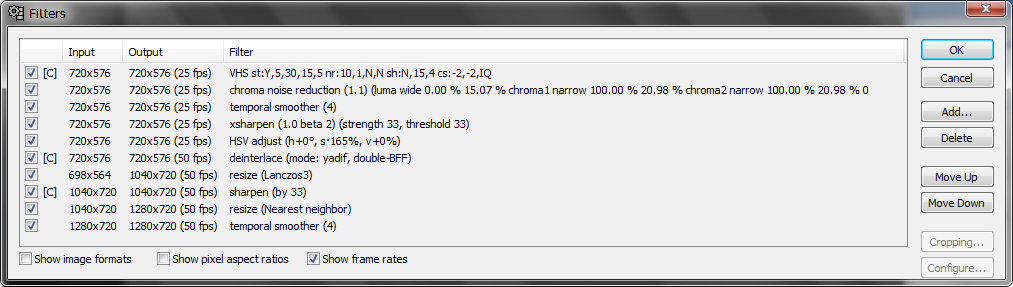
The original 720x576 (0r 720x480) format will profit from upscaling
(after deinterlacing), if a good filter such as Lanczos is used.
Lanczos delivers about the crispest results. There are apps pretending
to generate extra resolution from a comparison of subsequent images. My
tests with several camcorder sources, however, revealed no benefit
whatsoever, in spite of the very long processing time. So the methos
presented here rely on classical rescaling.
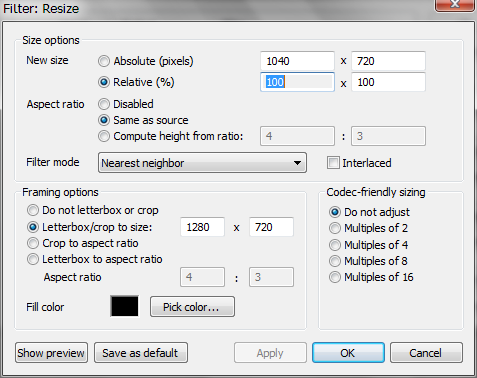
An appropriate target format is 1280x720, as there is no further
benefit for resolution if we go to 1920x1080. The source material
however is 4:3 in most cases (recording 16:9 back then meant just
clipping the format at top and bottom, sacrificing resolution, which
hardly anybody would reasonably want to do).
This means we would rather have to use 960x720, which is not a
standard. Or, we do what TV stations do, adding black borders to the
left and right. The black areas require almost no bandwidth, so the file
sizes do not increase; so this appears reasonable.
4:3 on a current 16:9 screen, however, looks quite slim, more like 5:4.
This is an optical illusion caused by the wide screen frame, and it
makes old material look ugly. I suggest to stretch the format a bit.
up to 10% stretching goes almost unnoticed, and in my opinion makes the
video look a lot better on a wide screen. I suggest scaling to 1040x720
plus black sides. This is of course a matter of personal preferences.
Encoding to progressive HD results in a perfect source for further
processing, such as cutting, editing, or de-shaking. Contrary to former
recommendations, here we do the cleaning, scaling and deinterlacing
first, on the raw sources. Encoding with high bit rates delivers new
master quality sources.
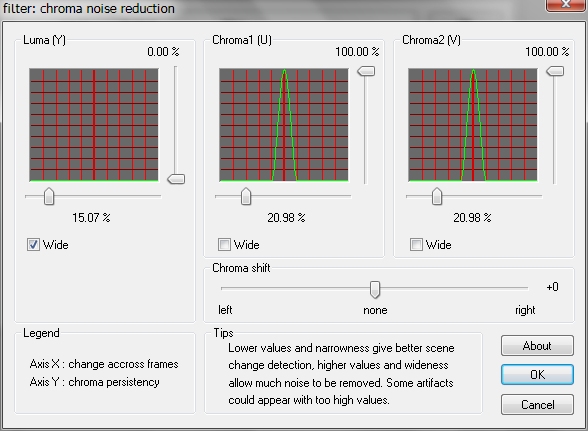
Really specific for analog tape recordings are jitter (timing errors from scan line to scan line, resulting on jagged vertical edges), chroma noise (color flicker)and chroma shift (vertical shift by 2 lines is inherent to all analog color systems, and horizontal color displacements can be caused by bad signal processing.
Other characteristics are lower horizontal than vertical resolution, luma noise, and deviations of color, brightness and contrast.
For more options on cleaning Hi8 or SVHS sources, you may the high quality filter page.
But in most cases, the following setting are more than OK. And, these are optimized for viewing on HD screens.
The Hi8 and standard 8mm settings shown here have been optimized by direct comparison of materials recorded with two according camcorders at the same locations, in order to look a equal as possible (except for the Hi8 still being a bit more crisp, of course).
Hi8
filter set
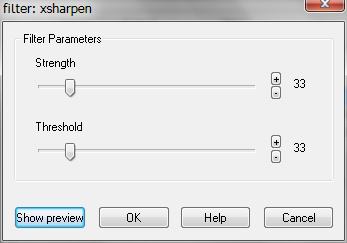
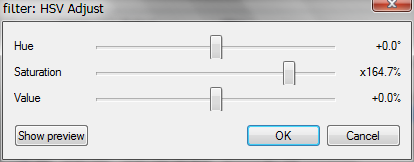
Hi8 needs fewer filters than standard 8mm, so we show them first. These
are the settings files for VirtualDub:
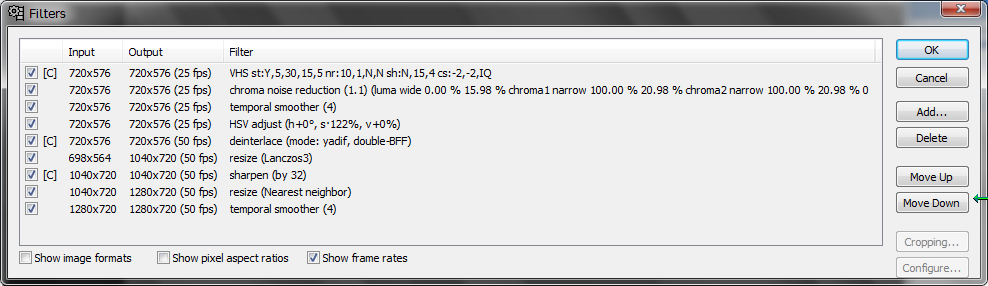
Click here to download this VirtualDub script.
Detail discussion:
Standard 8mm filter set
Click here to download this VirtualDub script.
Differences against the Hi8 filters:
Digital8
I cannot present Digital8 settings directly aligned with the above. Yet, you may start from the settings in the old 'cleaning' page, and probably tweak them a bit.
Using the scripts
VirtualDub can directly pass its output ('frame serving') to other applications. We use it to generate input for the x264 encoder.
- To enable frameserving (if not yet done): Install Auxsetup.exe that comes with VirtualDub (Aviproxy is not necessary).
- Open your DV file in VirtualDub.
- Load the script file ("load processing settings")
- Open your DV file again (necessary to make VirtualDub notice the frame count has doubled due to the deinterlacing filter)
- Select 'File', 'Start frameserver', give it have some name (which, doesn't matter at all), and when prompted save anyname.avi.
- Note
that we can't serve audio this way. Audio must be turned OFF in
Virtualdub, as x264 would otherwise quit with an
error. The scripts provided above have audio
turned off. We will later on add the original
audio from the DV files to our compressed video.
- Start x264 and open the just saved avi file (which is not really an avi file but the means for passing the image frames to x264).
- If
this does not work (I can't say why it didn't work for me once, but now
it does), you can use the avisynth workaround described here.

When done, press "quick encode". A command prompt window appears, showing the encoding progress.
The files we get this way are about 2/3 the size of the original DV. Given the much better compressing ability of h264, this is really huge, indicating this is almost lossless.
We compressed video only, so we have to merge the video file with the audio from the original DV. This audio is uncompressed PCM, but this does not matter as the video is huge anyway. The merging is done with MKVtoolnix and is done according to the procedure described here.
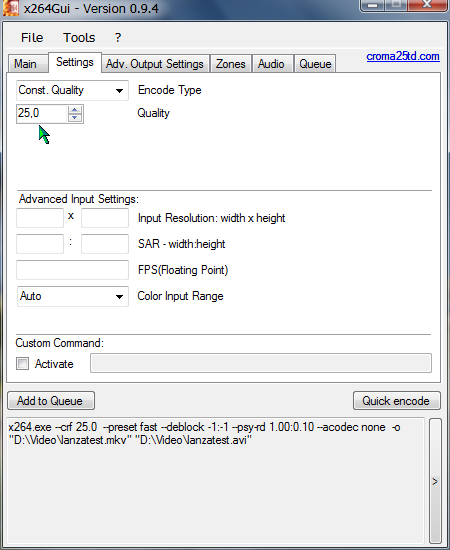
--preset fast --deblock -1:-1 --psy-rd 1.00:0.10
Deshaking
The largest quality issue with older camcorder footage is shaking images. There is a very good deshaker by Gunnar Thalin, that may do magic to old tele shots. I have written a special page on this and the results are excellent so far concerning still and tele shots, the most annoying parts if not stabilized.
I've not yet found a universal setting to use
in entire
tapes without manual interference (and the settings there are for SD,
have to be adapted for HD). The HD delivered with the above procedures
should nevertheless be an ideal input for the deshaker, and with a
current computer one can afford to deshake entire tapes. With an
editing software like Magix Video deluxe, e.g., the original and
deshaked files can be treated as two camera channels and the better
variety can be selected scene by scene.
VHS tv recordings
Many
old tv recordings are not as good or worth the effort as above. There
is a simple but very efficient bulk filter set quite adequate for these
cases:
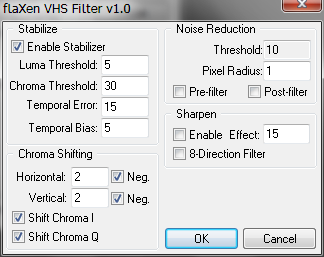
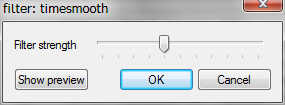
Use the VHS filter and then just the temporal smoother,
set to 5. Leave the interlacing as is. This results in pretty clean
pictures. Note that these 2 filters are the absolutely necessary
minimum, and only VirtualDub has them.
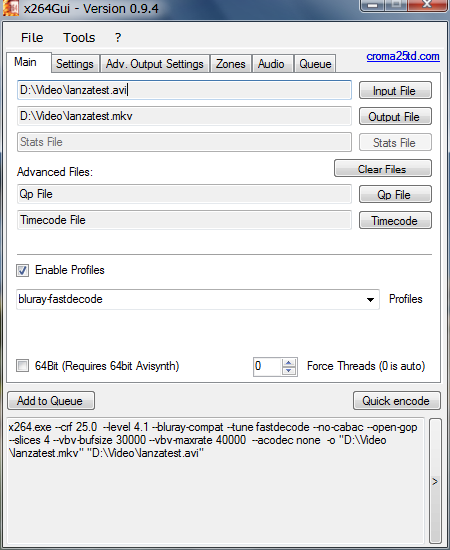
Use an x264 profile like this:
--level 4.1 --no-cabac --open-gop --slices 4 --vbv-bufsize 30000 --vbv-maxrate 40000 --tff --sar 16:15
This allows the interlacing and has the proper aspect ratio setting for 4:3 PAL format. More about these settings here.
More complicated VHS filter sets here.
Copyright
(C) 2015; all
rights reserved. All
materials in these pages are presented for scientific evaluation
of video technologies only. They may not be copied from here and
used for entertainment or commercial activities of any kind.
We do not have any relation to and do not take any responsibility
for any software and links mentioned on this site. This website
does not contain any illegal software for download. If we, at
all, take up any 3rd party software here, it's with the explicit
permission of the author(s) and regarding all possible licensing
and copyright issues, as to our best knowledge. All external download
links go to the legal providers of the software concerned, as
to our best knowledge.
Any trademarks mentioned here are the property of their owners.
To our knowledge no trademark or patent infringement exists in
these documents; any such infringement would be purely unintentional.
If you have any questions or objections about materials posted
here, please e-mail us
immediately.
You may use the information presented herein at your own risk
and responsibility only. We do also not guarantee the correctness
of any information on this site or others and do not encourage
or recommend any use of it.
One further remark: These pages are covering only some aspects
of PC video and are not intended to be a complete overview or
an introduction for beginners.